Add Weapons
Step 1
Open the file TantraParam.xml and we locate ourselves in the Item sheet.
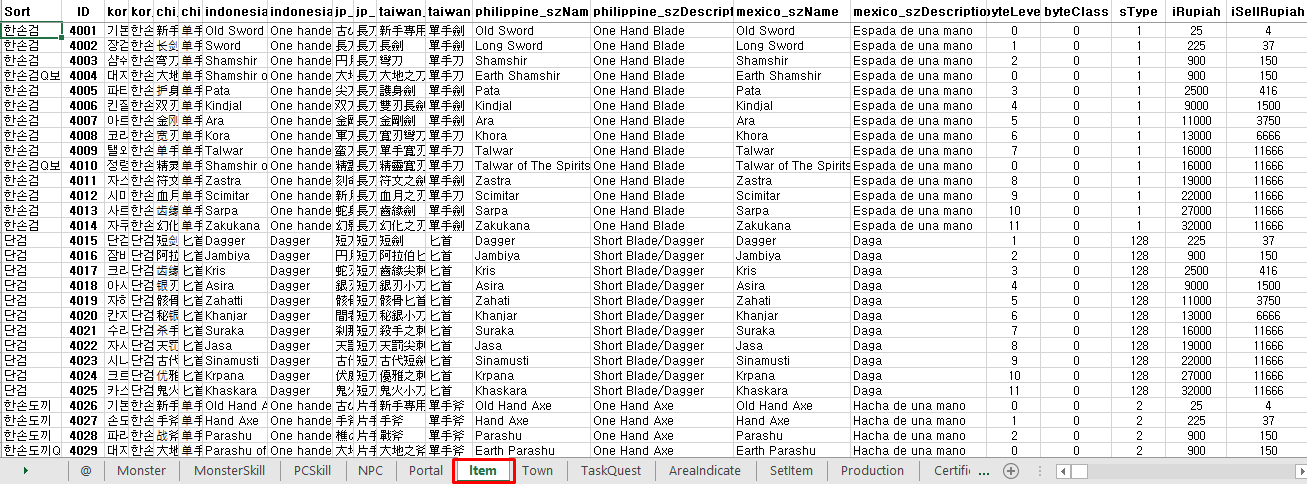
First we must be clear if the weapon will be one-handed or two-handed. Based on this, we can locate ourselves in a position in a row to add a new one.
Read more about row groups here.
We can copy a weapon of the same one that we want to add to have a base structure.
For this example we will add:
- ID: 4396
- Name: Sword 19th
- Description: Two Hand Blade
- sType: 513iLimitTribe: 15

Step 2
Now we open the Clientres.xml file.
Here we are going to see the following sheets:
- Item = Assembly configuration.
- ItemTMD = 3D model object.
- ItemTex = Texture of the 3D model object.
- MAINUI = Icon of the Item.
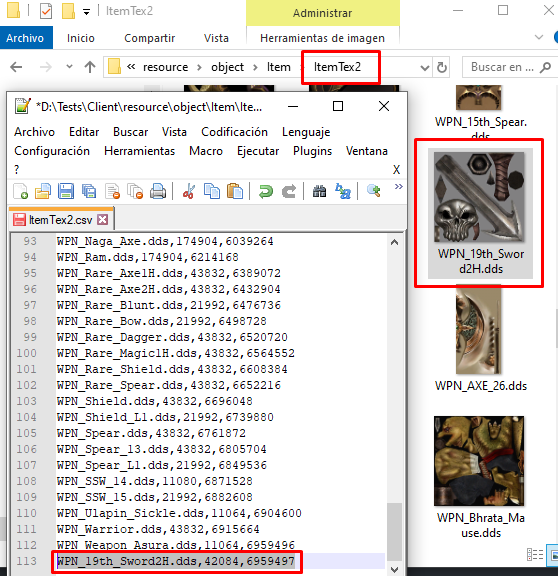
ItemTex
In the ItemText sheet, we are on the last line to add the texture resource. The extension of the texture file is DDS.
For this example we will add:
- ID: 24409
- File: WPN_19th_Sword2H.dds
The hpk file must be unpacked, in the case of textures, the HPK2Files tool is used for this. Choose the option HPK2 => Files.

The files configured in the XML must be added in the following directories:
-
resource/object/Item/ItemTex2.hpk : WPN_19th_Sword2H.dds
-
resource/object/Item/Mesh/Mesh: WPN_19th_Sword2H.tmb
Now, for the client to interpret the added files, the resources must be added to the ItemTex2.csv file.
Add a line at the end with the resources. This file can be opened with notepad or another text editor.
WPN_19th_Sword2H.dds,42084,6959497
Now we repackage it with the tool HPK2Files Files => hpk.
Go to the package folder and extract (copy) the generated ItemTex2.hpk file, to replace it in a previous path.
ItemTMD
In the ItemTMD sheet, we are on the last line to add the models resource. The extension of the model file is TMB or TMX.
For this example we will add:
- ID: 14445
- File: WPN_19th_Sword2H.tmb
- NAGScale: 100
- ASUScale: 100
- AKScale: 100
- DEVScale: 100
- KIMScale: 100
- RAKScale: 100
- GANScale: 100
- GARScale: 100

Item Icon
To add the icon, you must first unpack the MAIN_ITEM.hpk file, choose the option HPK2 => Files.
Add the icon file and insert the image file.
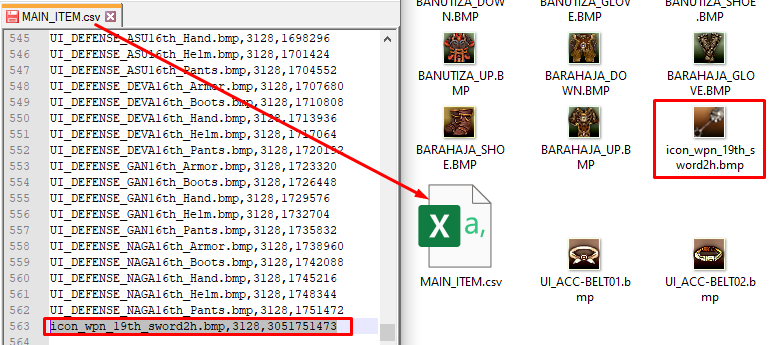
Now we repackage it with the tool HPK2Files Files => hpk.
icon_wpn_19th_sword2h.bmp,3128,3051751473
Go to the package folder and extract (copy) the generated MonsterTex2.hpk file, to replace it in a previous path.
Item Assembly
In the MAINUI sheet, we are on the last line to add all references resource of the icon.
For this example we will add:
- ID: 76318
- Name: 19th Sword 2H
- File: icon_wpn_19th_sword2h.bmp

In the Item sheet, we are on the last line to add all references resource of the model.
For this example we will add:
- ID: 4396
- Name: Sword 19th
- Type: 909
- Model_ID: 14445
- ModelTexID: 24409
- Inventory_Tex_ID: icon_wpn_19th_sword2h.bmp

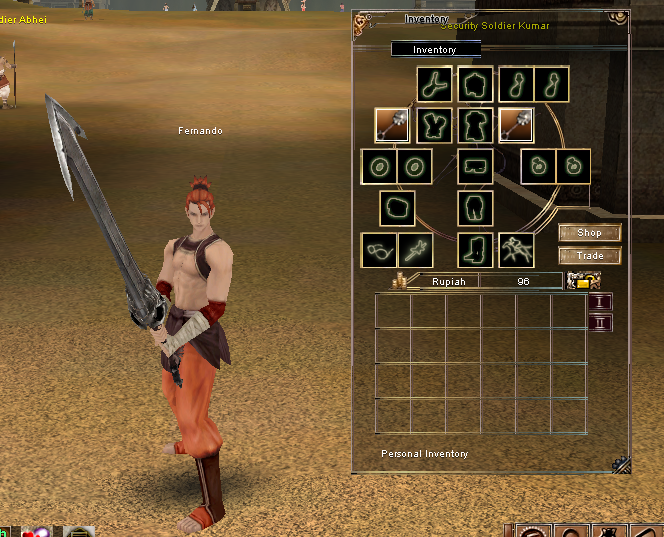
Step 3
Test result
To test the changes made. We open the compilation tool for XML XML2TXL. We do the conversion: Convert S_Param, Convert_CParam, ClientRes.
We paste the files Clientres.txl and TantraParam.tpa in the Client's system folder. We rename the file TantraParam_tpa.tpa by TantraParam.tpa and replace it on the server, in the corresponding zone folder.
We introduce the weapon created to our account using GMTool.exe.

source: content_development/items_management/add/weapons.md